JS1K 2017: some kind of magic (plus a few other news)
February 2017
News:
there's now a Slack room dedicated to JS code-golfing: jsgolf.club.
You can fill this form to get an invite!
And a big thumbs up for Dwitter: a platform allowing to make art on a canvas in 140b...
Also, Dwitter inspired this entry by p01, and this 140b clone by nderscore.
Update: results!
MiniShadertoy arrived 7th and Can I Haz 1Karrot? arrived 8th!
More info on js1k.com (many entries of the Codegolf Team members are in the top 10!)
JS1k:
JS1k is certainly the most important rendez-vous for JS code-golfers each year,
and this time a lot of people have been very busy to submit incredible entries with the theme "some kind of magic"!
Here are the 5 entries I worked on, in team and alone, plus some anecdotes and tricks we found while making them!
Mini Shadertoy
made with literallylara, nderscore, innovati, subzey, p01, sqaxomonophonen (and aemkei for the non-js1k version)
- PLAY
- COMMENTED SOURCE
- GITHUB
Our first team entry is inspired by our previous work on WebGL: MiniShadertoy, MiniShadertoyLite and WebGL playground.
We completely reworked these apps to include a split-screen UI, shareable URLs, a perfect compatibility with Shadertoy's syntax and a cool built-in example. (plus a fullscreen view on double-click).
As a result, our entry is able to play demos from shadertoy.com (like Seascape), provided they only contain one shader code, and no extra buffers or channels.

Tricks and lessons learned:
- Making this demo was not as easy as taking our 349b WebGL bootstrap (minus the free g=a.getContext`webgl`) and packaging it in a nice UI. We decided to include the same shader inputs as Shadertoy's (iResolution, iGlobalTime, iTimeDelta, iFrame, iMouse and iDate). To do so, we made a loop that sets/updates these variables at each frame (here), while the g.createShader (called on load and after each keyboard input) starts with the declaration of these variables (here).
- The fragment shader declares a main function, that calls mainImage(), which is editable in the demo. (here).
- To have the same color rendering as shadertoy, the main function always sets the alpha byte of the current pixel to 1 just after calling mainImage. (here).
- Our WebGL bootstrap also had a special way of computing the pixel coordinates: the origin was centered on the canvas because we used the vertex position (passed to the fragment shader as a varying variable) as normalized coordinates (often called `uv` in Shadertoy demos); Conforming with Shadertoy's coordinates (with the origin on the bottom-left corner) required to change "varying lowp vec4 p" into "attribute vec4 p" here. Then we added this line in the built-in demo to make it look fine: "vec4 p=vec4(coord/iResolution*2.-1.,0,1);"
(the "*2" is used to stay in the [-1:+1] range, and the coord/iResolution*2.-1. is used to center the pattern on the canvas.) - The WebGL canvas and its context are provided by JS1k's shim, but we couldn't add the textarea in the DOM with "b.innerHTML+='<textarea>...": that would have rewritten the canvas and its 2D context would no longer be valid. So instead, we used insertedAdjacentHTML: here.
- With JS1k, you can never assume (or force) the intrinsic width and height of the canvas, you can only set its max-width and max-height. So to adapt our demo to this constraint, we measure the canvas' width and height and use this measure when we update iResolution (here) and iMouse (here and here). Then, the canvas is distorted in CSS to fit one half of the screen (or all the screen after a doubleclick): here.
PERIOD1k reloaded
made with innovati and subzey
- PLAY
- COMMENTED SOURCE
- GITHUB
Last year, we submitted PERIOD1k, a periodic table drawn on a canvas.
This time, we rewrote it entirely and the result is much better!
It's rendered in HTML/CSS and generated with a big chunk of ES6 template literals (26kb of generated code in total!)
It contains the definitive names for the last four elements (officialized in June 2016), better responsiveness, and a new information: the state of each element at room temperature (Liquid / Solid / Gas).

Tricks and lessons learned:
- When you think something can't be golfed any more, try rewriting it entirely! Very often, new optimizations will appear just by reordering your code differently.
- With this version, switching from canvas to pure HTML wasn't really shorter, but had the advantage to produce a scalable periodic table, without any pixellization. So, definitely a plus.
- On the other hand, one huge improvement consisted in merging all the data (name, color, atomic mass, plus the new info: the state at room temperature) in one big string that's easily splittable by cutting before the capital letter present at the beginning of each element's name (here). This new organization allowed to stop encoding the 118 element's colors separately, but instead, only encode an element's color if it's different from the previous one, and saving one byte if it has the same color. There are only 46 color variations from one element to the next, so 46 bytes are enough to store them. The code used to decode each color correctly fits in 10 bytes (here).
- The free space allowed to add one char for each of the 2 liquids and a char for each of the 12 gases. All the other elements are solid so it's the default state. The states are then represented by a letter (L / G / S) with a very simple test (here).
If the Moon was 1px
made with innovati
- PLAY
- COMMENTED SOURCE
- GITHUB
This demo is a tribute to If the Moon were only 1px by Josh Worth, reimagined with the hard constraint of 1kb.
We wanted to make an extremely complete and precise solar system, with all the planets, dwarf planets, satellites and belts.
We almost nailed it: all the planets positions are precise with a margin error < 1000px, and their size is pixel-perfect;
the major satellites have pixel-perfect positions and their full names are displayed in the page;
The only important size/accuracy compromises are the belts (not drawn in the page) and the minor satellites (placed at pseudo-random positions and not named).

Tricks and lessons learned:
- Always aim big to see how many things you have to cut! At first, we had made a big table with all the names and position for the 21 moons and the 161 minor satellites. This took a lot of time, but trying to compress it has made us understand that we could not fit all the minor satellites information in our entry, as the dataset was already bigger than 1kb. but it was a good starting point to golf and simplify our data. by ignoring all the minor satellites, we saw that all the rest could fit pretty comfortably in 1kb, and this allowed us to make a nice UI (with a legend, a title, comfortable margins everywhere, etc) and add interesting details, like the planets Unicode symbols (here) and the rings for Jupiter, Saturn, Uranus and Neptune (here).
- We wanted to display the moons centered horizontally in the screen, and have their names written on the right side, centered vertically. Since all the moons sizes are rounded to 1px, the trick was to represent them with a braille character containing one dot at the center ("·"), followed by a non-breaking space ("\xa0") followed by the moon's name, and place all that in a container with a 5px width (here). The illusion is perfect! (NB: the minor satellites are just ASCII points: ".").
- If the CSS doesn't behave like you want, force it! For example, all the moons had very precise positions, but because of planets margins and rings, and the moons names' font-sizes and line-height, plus the space contained in the braille character, all the moons were displayed in a wrong position! After trying to understand and fix that (in vain), I finally decided to adjust manually all the distances in the dataset, in order to have a perfect result, even if the hardcoded values are wrong. ("ah, this one is 9px too low... welp, let's change its offset from 62 to 53!", etc).
- We wanted to make everything twice as big (like, "if the moon was 2px!") to display more details, but there was an unexpected problem: the page was too long, and browsers stopped rendering them after a certain height. Haumea, Makemake and Eris were broken, so we decided to switch back to a 1px Moon. If you want to see more details, you can still use your browser's zoom!
- Planet X was considered, but is too hypothetical, too mysterious and too far to be displayed accurately.
- The Oort cloud, of course, couldn't be shown on the page, because it's more than 200 times further from the Sun than Eris. So we added a little indication to say that it's far away (here).
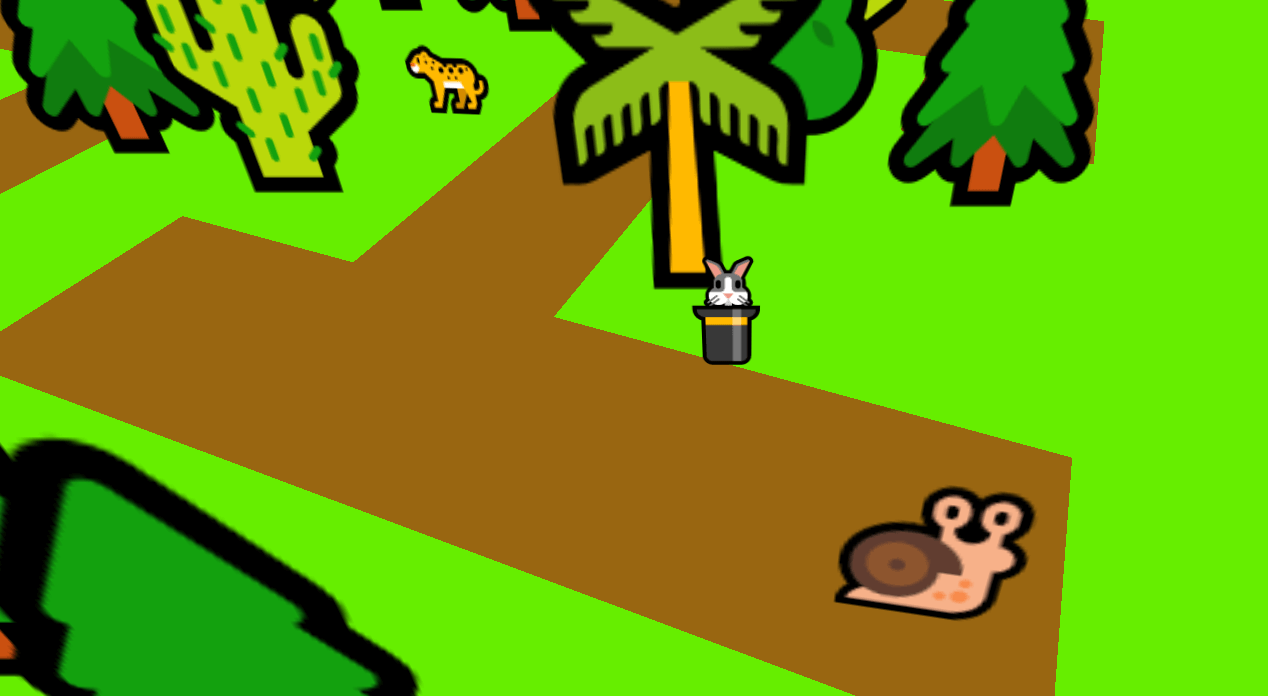
Can I haz 1Karrot?
Individual entry
- PLAY
- COMMENTED SOURCE
- GITHUB
I always wanted to make something cool with CSS3D and emoji, but never had the good idea... until a week after the start of JS1k, when I realized I could make a game with a rabbit in a hat that could run through a maze to find its carrot, and with a surprising ending. All the other details were improvised during the next ~3 weeks of intensive development.
This demo relies heavily on two CSS and golfing experiments from 2016:
- JS games inputs (to support both arrow keys, WASD and ZQSD in 82 bytes);
- How to make games in CSS3D
(though all the "good practices" of this tutorial were heavily tortured and trespassed in this demo in order to save every byte possible).
Mobile controls would have been cool (moreover, mobile browsers have no problem displaying the demo), but it would have been so heavy to listen to touch events and bypass their default behavior to make the rabbit move (around 200b), that too many features would have been cut out (no animals, bad collisions, bad camera, less trees, etc.) and it was too much of a downgrade to me, so I abandoned it.
Same thing for the sound or the interaction with the animals: they were sacrified to make the main thing more enjoyable.
Big thanks to Keith Clark for his CSS3D expertise, and to the friends from the Codegolf Team for their tests!
Video:
I made a video recording to show the demo played in the best conditions (Windows 10 + Webkit):(WARNING: SPOILERS!)
Tricks and lessons learned:
- CSS3D is fun!. It provides a 3D engine almost for free! No need to implement any kind of raycasting, depth-sorting, etc. !
- CSS3D is still highly experimental. We're in February 2017, and Firefox explodes (I mean: stops doing any kind of z-sorting) when a page contains more than 100 "CSS3D" elements (i.e. elements with rotate / translate transformations). Firefox 53 will finally drop this limit, but it'll only release in April. So for this JS1k, my game had to respect this limit, and if you count the trees, the ground tiles, the animals, the carrot, the rabbit and the hat, you'll find a total of exactly 100. I could have added much more trees and other items to make this forest much more dense, but it was too expensive. Firefox still has a few little visual glitches but nothing dramatic...
- All the ground tiles could have been replaced by just one element, and the entire path could have been drawn with multiple brown CSS box-shadows on this element (like here). It was too glitchy on some browsers, mostly the MacOS ones, and I had to revert that. (too bad! the box-shadow trick weighs as many bytes as the current method but it would have made room for a few dozens extra trees).
- At the minimum, you have to use 2 div containers around your scene objects to make the CSS3D magic work.
The outer div acts as the viewport, and must have a width, a height, a perspective and overflow:hidden (like here). Avoid using the body element as a viewport, as it can cause weird effects too.
The inner div gets the "transform-style:preserve-3d" CSS property to enable realistic perspective for all the scene, and has margins to have its top-left origin placed at the center of the viewport (like here). I call it the scene container. - All the children of the scene container can be placed where you want either with margin-left + margin-top, or transform:translate(x,y) or translate3D(x,y,z) (which is handy to place them above the floor). The objects in the scene do not need, and MUST NOT have the CSS property "transform-style:preserve-3d", because it can lead to weird behaviors and important visual glitches on some browsers. Setting it on the scene container only is enough.
- Emoji are fun! They provide cute visual assets almost for free!
- Emoji are a pain to use consistently across browsers and OS's. Not only they'll appear differently everywhere (ugly on Mac, monochrome or tofu on Linux and Edge, and quite good on other Windows 10 browsers), but they'll also have different horizontal and vertical alignments. I've spent most of these weeks fighting with flying trees, animals going below the ground, and the rabbit head always placed on one side of the hat or the other, depending on the OS...
In the end, I had no choice but detecting MacOS (with the trick "navigator.platform[5]") to set different sizes and positions on MacOS and other platforms (here). Thanks to the codegolf team for helping me find such a short MacOS detection script! - No need to set a big green floor in 3D under the scene, setting a green background to the viewport div does the trick! (so technically, the trees and animals fly above an infinite void, but painted in green).
-
 Some browsers / OS's have a threshold for multicolor emoji:
they become monochrome after a certain font-size.
This limit varies a lot from a system to another,
but a font-size of 7em seemed to work everywhere.
(In the context of this demo, 1em is 16px, so 7em is 112px.)
Sadly, 7em is too small for my trees!
The solution was to scale the trees 2.5 times with an extra CSS transform. - The polyglot keyboard code (arrows / WASD / ZQSD) was originally 82 bytes long, but this demo uses a modified version, with more repetitions, in order to RegPack much better (here).
Also, the "onkeyup" word is reused a lot in the rest of the code to differenciate trees and animals (here and here), which is a good byte saver. - The demo consists of a few variables initialized to 0 (frame counter, tree counter and keys states), and a game loop, in which the frame counter is incremented at each frame.
RegPack 5.0.0 featured a "refactor with setInterval" feature that was cool but added unnecessary code inside the packed code (this was then fixed in regPack 5.0.1).
So while RegPack was being fixed, in order to achieve the best compression, I RegPacked the content of my loop function as usual, then I replaced the final "eval(_)" with "setInterval(_,33)", and replaced "_=join(shift())" with "_=join(shift(q=u=d=l=r=f=0))" (I included my 6 variables initializations in the shift function). - Do you know the "- It hurts when I do it - Then don't do it!" principle? For some reason, the rabbit could escape the maze on the left (behind the snail) and on the top of the "1" and the "k", i.e. when its x or y was below zero. It could only escape inside one virtual square though, but couldn't go anywhere else in the green infinity. I couldn't find a convincing explanation for this behavior, but fixed it in my collision detection (here).
Edit: I finally understood what caused this glitch: the x and y coordinates of the rabbit are divided by 3 and floored with "~~" to determine what floor tile is under the hat. If the rabbit can go on the 0'th tile of a line, or any tile of the 0'th line, it can also go to the tile "-1" (or the column "-1"), because when you floor any number between 0 and -1 (excluded) with the "~~" operator, you get 0!
The whole collision detection script uses the same principle actually: at each frame, the rabbit moves according to the keys pressed, and if its position is not on the path, cancel the move and keep the rabbit at its previous position. Works like a charm! - By the way, the snail is a wink to Rebecca (@veubeke) who's the biggest snail fan I've ever met, and a great golfer too!
-
 While making this demo, I had the idea to tilt all the objects (trees, animals, carrot...) towards the camera, to make them look less uncomfortably vertical.
This trick is quite unnoticeable during gameplay, but can be seen in the "glitchy state" after the end of the game, when the camera follows the rabbit with a 5-second delay.
Fun fact: I discovered after submitting my entry that Mario 64 did exactly the same thing for its sprites! (source) - One final ES6 trick, found on Twitter with the great help of to Mathias Bynens (@mathias) and @FakeUnicode: the shortest way to make an array of Unicode symbols without breaking surrogate pairs is: "[..."unicode text"]". (I used it for the trees list here).
WIP screenshots and funny glitches:
- At the beginnong, I tried to show a mountained horizon, and make a floor that was only comprised of emoji color variation characters
(such as 🏻 🏼 🏽 🏾 🏿).
This was abandoned for being too heavy and too inconsistent across browsers and OS's.
- Here's how the first prototype "seen from above" looked on Firefox, Edge, Chrome, Safari Mac, Android 5.0 and Ubuntu:
The rabbit-in-hat offset was then adjusted to be good on all OS's except Mac, and a MacOS hack was added on top to make it look good.
-
At least, my undefined errors appear in 3D! (this happened when I tried to hide some trees)

-
The animals could have talked to the rabbit... (but there wasn't enough room for that)

-
This appeared when I tried to refactor the inline style of the trees...

-
This happened when I tried to animate the animals but not the trees...

-
This happened when I tried to apply CSS transitions from the beginning of the game instead of applying it only at the end...
Bad idea, even though if it would have made a funny introduction.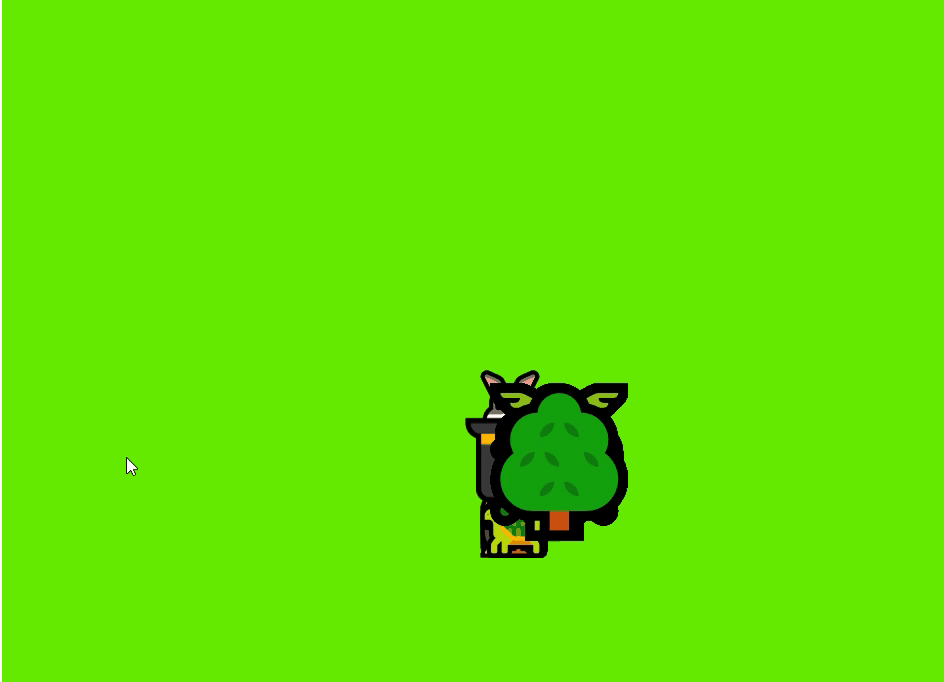
-
This happened when I refactored my emoji...

- And finally, the Carrot Update © ! On MacOS Sierra < 10.2.3 there is no carrot emoji. Nothing appears where the carrot is supposed to be. That's why the demo description says it's only suited for MacOS 10.2.3+... Jokingly, we imagined that Apple deployed Mac0S 10.2.3 as "The Carrot Update ©", just to fix the missing emoji 🥕 :D
1Kind of magic
Individual entry
- PLAY
- COMMENTED SOURCE
- GITHUB
This demo was rushed during the last week of the compo, after seeing @literallylara's entry magic flute. (which has a remarkably readable source code).
As a joke, I asked "what if we played Queen's "A kind of magic" in JS? that'd be a fun interpretation of the theme!".
I ended up handwriting every note of the song and playing them with two JS oscillators (one for the melody and one for the drums starting after 12 seconds).
The remaining room was used to display some emoji at the center of the page, changing the background after each note, and using a little bit of JS speech synthesis to pronounce the first 3 lyrics of the song.
It was also a good occasion to finally make a non-mute demo for js1k!
The Speech Synthesis is inspired by miniSpeechSynthesis.

Tricks and lessons learned:
- Lara managed to convert a MIDI file into a ready-to-use array of numbers. Unfortunately, this didn't worked well for the MIDI interpretations of "A kind of magic", the melody was corrupted after a few seconds. That's why I plotted all the content of the MIDI file with and wrote each note and each silence by hand in a big array of numbers (here)
- Then, each note was encoded on two ASCII chars: the first one represents String.fromCharCode(50 + note offset) and the other String.fromCharCode(50 + duration). Each silence was encoded on one char: String.fromCharCode(97 + duration). This encoding allowed to avoid annoying characters like ", ', `, \ and the control characters (U+0001 to U+0020) used by RegPack to compress the demo. (here and here)
- The rest was pretty straightforward, except when I wanted to make the melody more quiet, in order to make the speech synthesis more hearable. The audioContext's gainNode is very poorly documented, and the team helped me wire it correctly to the oscillator (here).
- For some reason, a gain of 0.5, even 0.1 didn't change anything. I spent a long time trying to figure out why it didn't reduce the notes volume, until I tried 0.001 and finally heard a very low volume. The final code has a 0.005 gain on the melody and a 0.01 gain on the drums. It kinda made a good balance between the music and the voice on my laptop, but again, for some reason, it was super quiet on other PC's or browsers. Welp. At least it's kinda working everywhere, even if the voice can be a bit too loud for some people. And I'm quite happy with the length of the melody I managed to fit in this tiny budget!
Bonus: CSS golfing
To finish, I'd like to talk about a code-golf trick that I found while making these demos, and it's about inline CSS code.
It generally saves 1 byte per element, but hey, every byte counts!
Inline CSS looks like "<div style='...'>", and as you may know, the attribute quotes can be omitted if the inline style doesn't contain any space, for example "<div style=color:#fff;background:#000;border-radius:50%>".
My demos contained many CSS properties that generally use spaces, and I discovered I could get rid of most of these spaces, by removing them or replacing them with a "+" or quotes (''). Here are some examples:
- "margin: 50vw 50vh" can be simplified to margin:50vw+50vh
- "box-shadox: 2px 2px #222" can be simplified to box-shadox:2px+2px#222
- "font: 12px / 14px arial" can be simplified to font:12px/14px'arial' (for a custom font-family)
- "font: 12px / 14px sans-serif" can be simplified to font:12px/14px"" (if you want to keep the default font-family)
The only spaces that can't be removed so far are:
- spaces around the + and - in "calc(1px + 2em - 3vw)" (if they were absent, it'd make ambiguous signed numbers)
- spaces around keywords, for example in "font:bold 12px'arial'" or "background:url(...)no-repeat red".
There's a second CSS trick that can save many bytes when you write a lot of CSS functions, but I don't really recommend it because it doesn't work on Safari: all the closing parenthesis at the end of CSS rules (or at the end of inline styles) can be omitted, ex:
- width:calc(10px + 10vw
- transform:translate(x,y)scale(2
- etc.
Cheers!